Missile Command – Let the Missiles Rain Down
This is part 5 of a multipart series on creating a version of Missile Command using the educational tool, Scratch.
To recap so far, we’ve created the portions of the game that handle moving some crosshairs (so that we know where to aim), added a background to make the display more interesting and managed the firing of defensive missiles. It’s time to give the aliens some offensive capability!
In the original game, whilst you waited there patiently, lines would be drawn from the top of the screen down to the bottom, which you would need to blow up by firing your anti-alien-missile defences (read: circles!) I think the lines would remain on screen, could travel at different speeds and once you had stopped one (at least) another would come right behind it. If the trail of their missiles hit your bases (or in my case right now, the bottom of the screen), you would lose a life. I am going to slowly build up to the final solution but that is deliberate because I want you to see how I get to my final destination. Be aware, though, that this might appear a long winded way to describe what we need to do! So how do we achieve this? For the moment, these will be my goals:
- Only have one alien missile coming down at a time.
- Allow the speed of the missile to change.
- Ensure that the missile stops (and another starts) if it is hit by any of my defensive strikes.
Creating the Enemy Missile Sprite
To begin, we need to create our alien missile so add a new sprite using the paint new sprite button, and create a small square right in the centre. I chose a blue one because I wanted it to be really clear against my black background. Call this sprite Enemy-1 (just in case we do actually make some more).
The reason for this is that I want it to be really clear where the missile is coming from because behind it will be a trail of a line which might get lost amongst all the others. Making the Enemy Missile Sprite Move To begin with, we need to position the sprite right at the top of the screen since that is where our missiles will originate. To understand how to do this, it is worth looking at the help screen for the gotoxy command since that explains the geometry of the screen,
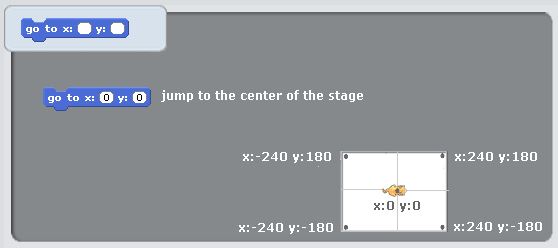
You can see that the top left hand corner is at (-240,180) and the top right, (240,180) which means that if we want to start at the top, we need a Y co-ordinate of 180 and an X that varies between -240 and +240. I decided that rather than start at a Y co-ordinate of 180, I would use 170. That is a little lower but I need to account for my square block that we just created.
Next, I want to use the pen feature to draw a line as the sprite moves. This is very close to how Logo can be used (something many children and teachers are familliar with). In much the same way, we’re going to set our pen colour, move the sprite right down to the bottom of the screen and then lift the pen back up again. Simple right? The key part of this is that we need to keep going until we touch the edge of the screen and move at a set speed. I chose a velocity of 10.
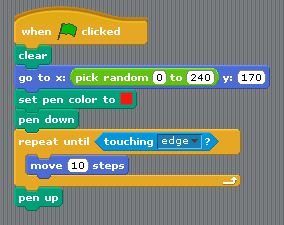
Notice anything about where the missile starts? You can see that we are picking a random number but can you work out which quadrant the missiles will start in? Run it and see what happens.
You will also notice that the missiles come down in straight lines when really, it would be much better if they could fire off at different angles to make things more interesting. To do that, let’s look at the help page for point in direction.
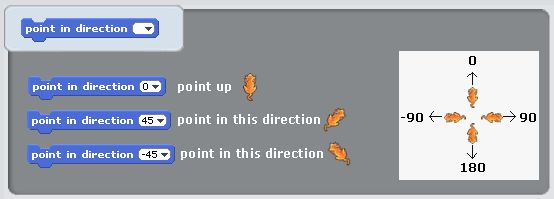
It is worth clicking on that image because you need to look quite closely to see that it isn’t a pointer in orange but a cat (look for the wiggly tail). So, we need our missiles (at least for now) to head towards the bottom left, which is a direction between -135 and -180. Minus 180?! Yes, because that is equivalent to 180 it seems (try it and see) and that makes it much easier for us to pick a random number. Here is the final script for what we have so far.
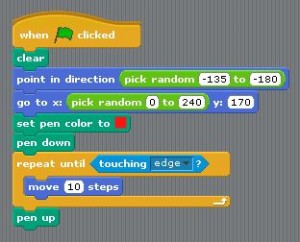
Why did we use -135? The reason for this is that I want the missile to fire at a 45 degree angle, at most. If we didn’t, it is very likely (though still possible) that the enemy missile will trundle off to the side of the screen, hardly causing a drop of sweat on our player’s brow.
It might take a little time to get the idea of the direction straight in your mind, but hopefully this makes sense.
Missiles From Both Sides of the Screen
To get a missile firing from the other side, we need to first make sure the start X position is on the left (that would be an X co-ordinate of between 240 and 0). We also need to play with the direction because if we leave things as they stand, the missile will zoom off to the left which won’t be particularly dangerous - to us at least! In this case, we want to direction to be between 180 (straight down) and 135 (which is a 45 degree angle to the right). The next script demonstrates this by firing two missiles, one after the other. The first will come from the right towards the left and the other, the opposite.
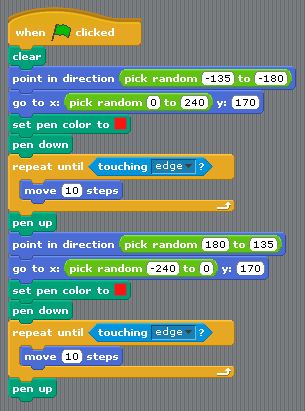
One Missile But Differing Start Side
It would be much better if we could get the program to decide which side the missile comes from because otherwise, it is far too predictable. To help us will be our friend the pick random command and a conditional test (a fancy way of saying, check something and do something about it, depending on the answer).
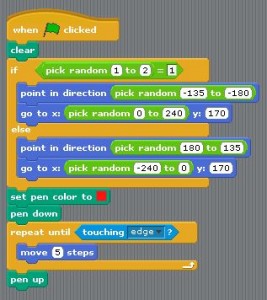
To implement this, I ask the program to pick a random number between 1 and 2 (that is, either 1 OR 2) and if it is 1, I will start the missile on the left hand side of the screen and point it to the right. If it is not 1 (this is where the else part comes in), I will start on the right and point to the left.
Everything else is exactly the same for both of the missiles we had above. Just keep on moving them in that direction until you hit the edge of the screen.
I also changed the speed (did you notice?) This was where I began experimenting with different speed missiles to see what effect it would have. You can do this too, to get an idea of how fast you want yours raining down.
Changing the Speed of Enemy Missiles
Much like having missiles starting in predictable ways, keeping the speed constant is another thing that really needs to change to add more of a challenge to the game. For this, all we need to do is to create a variable (I called mine enemy-speed-1), choose a random speed and then move at that constant until it hits the edge of the screen. Remember, to add variables, create them using the red tab (Variables) and click on Make a variable.
As an added feature, let’s make those missiles keep coming down forever (or until something good comes on television). We simply need to wrap everything up in a forever loop meaning, do everything inside until Doomsday.
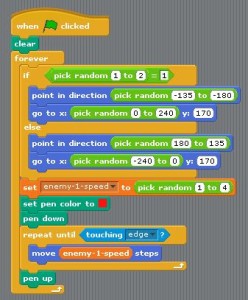
Detecting When We Hit Enemy Missiles
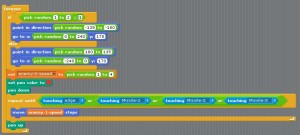
We’re almost done. We’ve achieved the first two goals (remember those right at the beginning?) and just need to get the missiles to blow up (stop, basically) when one of our defensive strikes hits them. This sounds like it will be quite tricky to achieve but is in fact really straight-forward. We just need to alter the loop that makes the missile move to also ask, am I touching any of the defensive missiles fired by the player? Here’s the final script and below that, a video showing all this in action.
Next time, we’ll add some scoring in.
The complete script.
Hi! Did you find this useful or interesting? I have an email list coming soon, but in the meantime, if you ready anything you fancy chatting about, I would love to hear from you. You can contact me here or at stephen ‘at’ logicalmoon.com